
One of my personal interests is that of gardening. I find it very enjoyable to tend to plants and help them grow. Even moreso when I’m growing tasty fruits or vegetables used in my cooking, which is another passion of mine.
My home and surrounding neighborhood has a feeling of being in nature, which I enjoy a great deal. We are surrounded my many douglas firs and other large trees that commonly thrive in the Pacific Northwest. However, this does present a challenge when trying to garden: few plants are able to do well in my yard, and certainly none can grow prolifically enough to bear much fruit.
So, indoors it must be. I’ve played with different hydroponics systems before, which can be quite nice. But being a DIY-person and how much I value freedom & repairability, I wanted to design and build my own. I’ve tinkered with these before, but it was quite a few years ago and I am eager to revisit it.
I stumbled across an automated hydroponics project by a fellow named Kyle Gabriel which sounded very impressive. His system seemed carefully designed, and best of all, he wrote and open-sourced an environmental monitoring & regulation system called Mycodo. This was key to having success with my project: I had enough free time to design my own hydroponics system, but certainly not enough to write a well-designed automated application to run it all. Mycodo is very flexible: it supports quite a diverse set of input sensors and outputs, along with filters, functions, actions and dashboards. I was thrilled to have discovered such a wonderful tool!
Kyle’s system leverages a number of sensors and controls from Atlas Scientific to determine pH & EC levels, control dosing of nutrients and more. Their devices are quite high-quality from my experience: things are designed well, functionality & documentation are great. I decided to leverage their sensors for pH & EC, as these can be very challenging to do well, but leveraging other solutions for further sensors and controls.
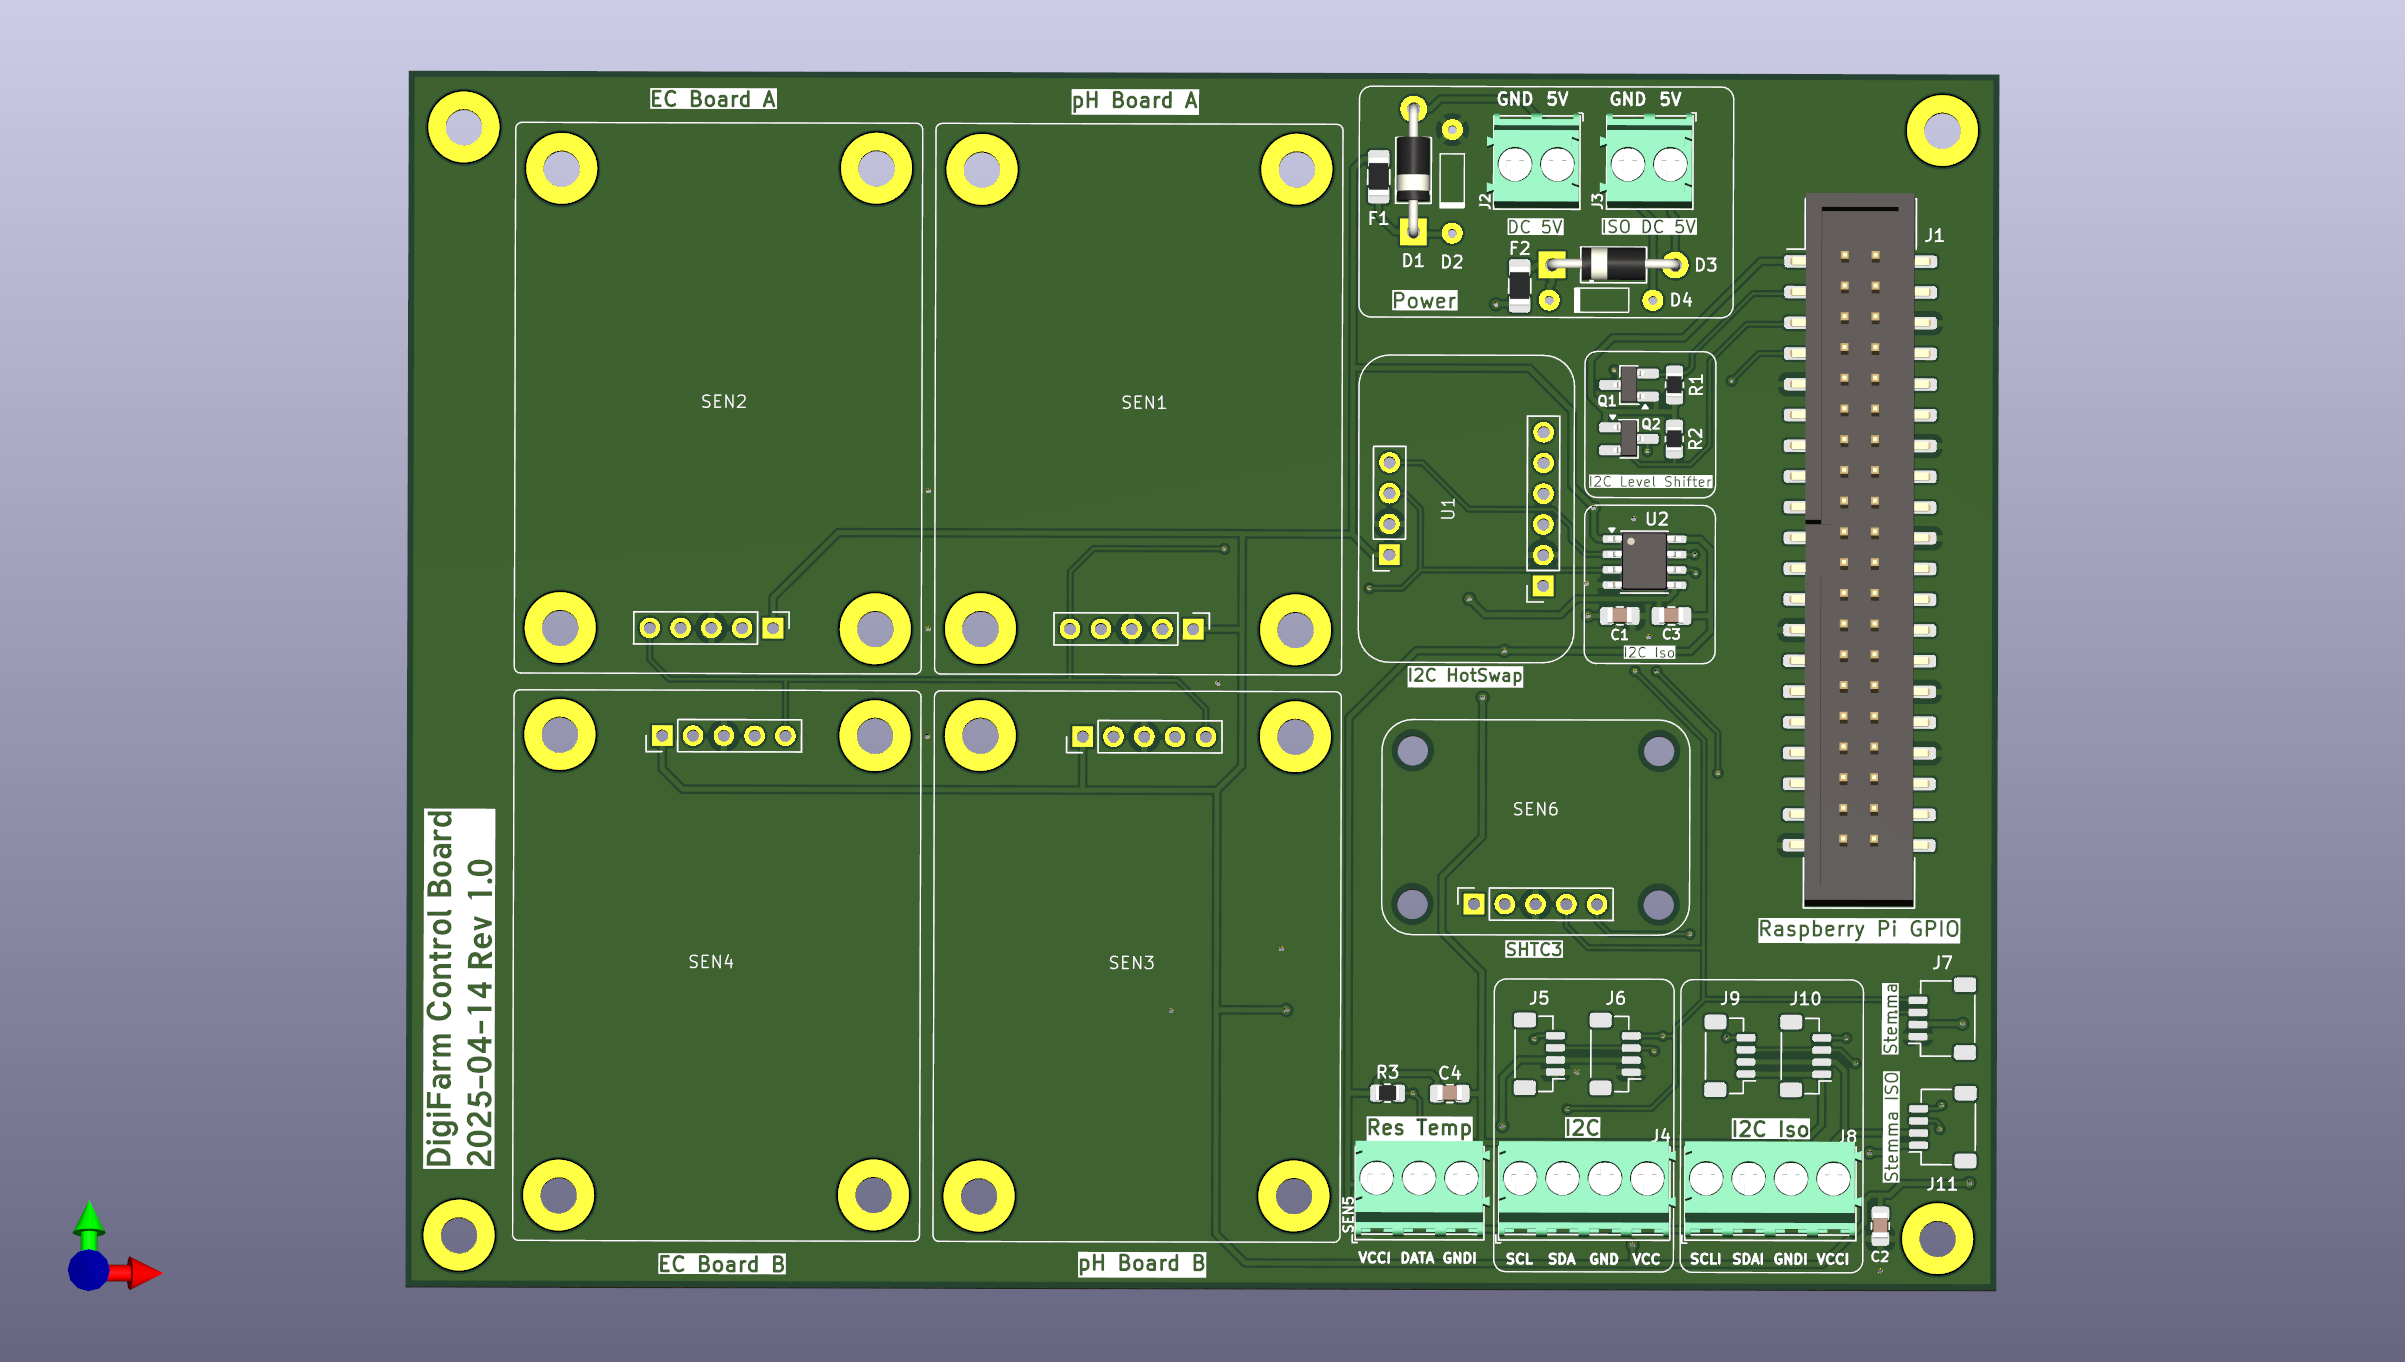
One of the choices I wanted to pursue was designing a custom PCB and electronics for this system. Unlike Kyle’s, I plan to have two separate systems running: one for vegetative stages (common herbs) and another for flowering (strawberries). This meant I would need two sets of these pH & EC sensors and each of them runs off an isolated communication and power board. I also wanted the flexibility to interface with the other sensors and controls as mentioned, and none of the offerings Atlas had supported 4 sensors natively, so a custom PCB seemed like the right choice here. In addition, I also designed my own isolated board to interface with each of the sensors; it was a simple enough job to include in the overall project, saved me a few dollars, and gave me a bit more design experience.

This is the isolated carrier board, which provides an isolated DC/DC power supply along with an I2C isolator module. I followed the design of Atlas’s boards pretty closely, but made a few small changes such as including a Stemma QT connector. My headers are also mounted differently to interface with the main “motherboard” (though this is not reflected in the 3D model above).

And this is the motherboard as I call it and has the following:
- 4 isolated board ports: 2 instances of both the pH & EC sensors (for vegetative & flowering reservoirs)
- 40-pin header to interface with a Raspberry Pi
- DC inputs for both a regular and isolated supply
- Level shifting to convert the 5V I2C down to 3V3 for the Pi
- I2C hot-plug module from AdaFruit (I2C does not support hot-plugging and the bus can get stuck if this is done when communication is happening)
- A dedicated I2C isolator module, to provide isolated I2C interface to other devices
- Interface for a SHTC3 temp/humidity module, also from AdaFruit
- Interface for Dallas 1-wire temperature sensors, for determining reservoir temperature (the pH & EC sensors use this in calibration)
- And several other ports/terminals for providing I2C and isolated I2C out to other devices
It has some rudimentary power protection (reverse polarity, voltage regulation and current protection), but these were designed quickly; they are very barebones as I was in a rush to get this PCB order sent out before the wonderful tariffs started to kick in!
I don’t have any “action photos” of it in use yet, as I’m still waiting on an enclosure to mount this and several other devices, but it has been tested and seems to work as expected so far. The enclosure should arrive this week, so I’m hopeful to have my current prototype migrated over to this board shortly and then more details on this project to be shared soon!
Leave a Reply