
Overview
This project came about after a cheap, old weather station finally died on me. It never worked well and I wanted to replace it with a custom display, pulling in data from my various environmental sensors and a few other Home Assistant-based sources.
Components
Hardware
- Raspberry Pi Zero 2W
- 64*32 RGB LED matrix (HUB75-based, Qty 4)
- Adafruit RGB matrix bonnet
Software
Other Tools/Development
- 3D printer
- GIMP
- OnShape
- PrusaSlicer
- OpenSCAD
Requirements
There were a number of competing requirements I had, which ultimately resulted in the hardware chosen:
- High-contrast display and easily visible from across the room in various lighting conditions
- Highly reliable with a long service life and minimal risk of requiring to replace a burnt-out display
- Low-profile, which I could easily mount to the wall
- Fairly moderate cost
- Low power usage
Display
I looked through a few display technologies, but in the end only one seemed viable. A simple LCD could work, but contrast is low, cost relatively high and power usage typically not great. An OLED display would be ideal for solving contrast, but are quite expensive, prone to burn-out and likely not even able to be sourced in the size I was looking for. RGB LED matrixes were the only display technology I could find which fit all of these factors. The resolution limitations of these were not a significant concern, given the data to display is relatively simple – in fact the low pixel count actually made layout of the display a bit simpler as it forced some design choices.
Hardware
I stumbled across a project called smartgirder, which gave me the inspiration for this. Initial attempts to leverage a similar Arduino-based platform quickly revealed the performance and display limitations, so I found a Raspberry Pi HUB75 controller from Adafruit and proceeded with that route. The displays themselves are 4 individual 64×32 RGB LED matrixes combined to create a 128×64 display. I went with the smallest pitch I could find which was 2.5mm, to keep the overall project size manageable.
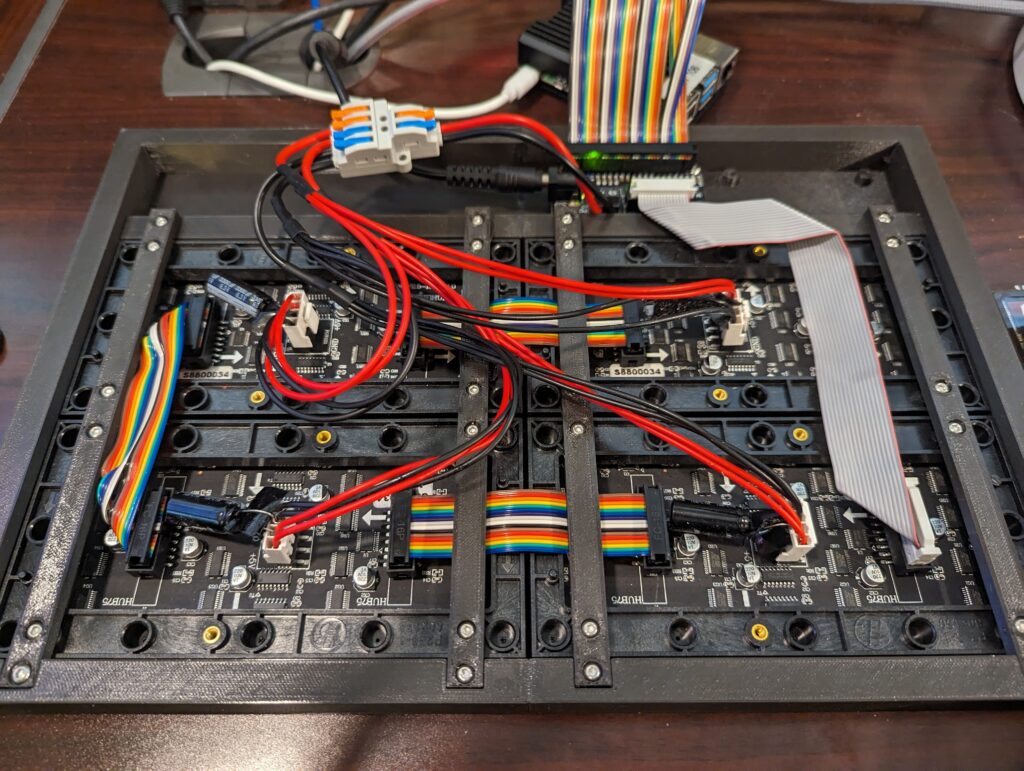
The nature of HUB75-based displays requires constant refreshing of pixel data and therefore is somewhat CPU intensive. Due to the desired low overall project size, I wanted to use a Raspberry Pi Zero for this. Unfortunately the original RPi Zero W, while easier to source, only has a single CPU core and thus some display glitches are occasionally visible while the background OS performs tasks. The Zero 2 W is the preferred hardware and thankfully I was able to obtain one, although with a significant amount of effort given this project started during the now-famous COVID supply-chain issues. A RPi 3 or 4 can also easily power this, and is what was used during development.
The enclosure was created with OnShape, after taking some measurements of the displays. A overall frame was designed, with some mounting arms for the displays. Two small standoff mounts were added below the displays for the RPi and HUB75 controller. The size of the case exceeded the dimensions of my Prusa, so it was split into two halves in PrusaSlicer then glued together. A few custom cables were created for the data and power and that wraps up the case.
Software
The code is a C++ application, which leverages MQTT to pull data from Home Assistant. A number of HASS automations were written to post data to MQTT on sensor updates and/or regular intervals; for example the weather forecast for the day updates every 10 minutes, calendar updates every 15 mins and so on. These are designed specifically to integrate with the various weather sensors I have throughout the house; I don’t love that aspect of the project, but it was the easiest way to get an MVP out. Perhaps this will be revisited at a later time.
The C++ app itself is relatively simple in overall design, though not what I would consider small. This project was also an opportunity to play with some of the newer C++ features and libraries; it has been a long time since I last used this language so it was enjoyable to built this out. Given that I am no longer bound to the limited processing power of the original Raspberry Pi Zero, switching to Python would improve the maintainability and speed of development, but those factors have not presented challenges yet so undertaking a rewrite would be unlikely to happen.
This also leverages the wonderful rpi-rgb-led-matrix library, which does the heavy lifting of providing a graphics API and background runtime which does the bit-banging job on the RPi GPIO. Before I was able to finally source a Zero 2 W, I switched over to DietPi as the base OS during testing since Raspberry Pi OS definitely had too much overhead for the original Zero W; this OS choice was kept in the final implementation since it worked so well.
Data
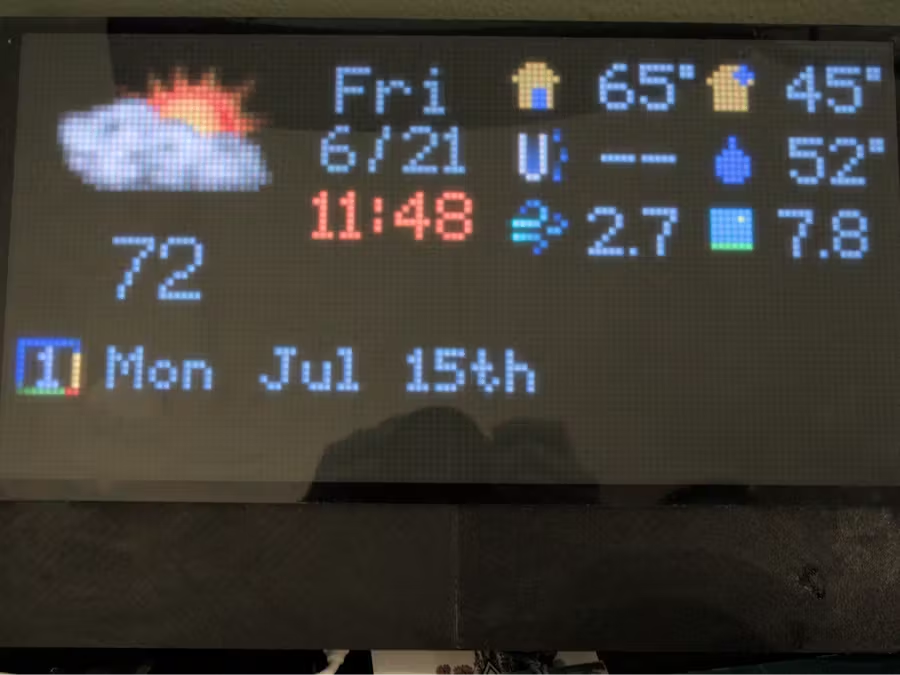
There are a number of pieces of data which the project will display:
- Clock date/time
- Outdoor temperature, current weather and dewpoint
- Weather forecast (high/low temperatures and conditions, displayed on a 10 min interval)
- Indoor temperature, dewpoint and HVAC state
- Rainfall in the past 1 hr
- Maximum wind in the past 15 min
- Outdoor PM2.5
- Next family calendar event; title and date/time
- Current weather alerts
As mentioned, all of these data points are sourced from Home Assistant via MQTT. Several automations keep the data in the broker updated, triggered from entity state/attribute changes or on a timer interval. It would be preferable if these could be sourced via the app repository to keep all the logic in one place, but unfortunately that functionality does not exist, not counting hard-coding them to an automations.yaml but I prefer to avoid that approach.
The actual sources for the sensor data vary: the weather forecast and alerts come from NWS & alerts integrations, the internal temperature/dewpoint data comes from Xiaomi Mijia Temp/Humidity sensors, and the outdoor temp/dewpoint/rainfall/wind/PM2.5 data come from 2 different outdoor weather station sensors I built. I may do a write-up about them at some point, but honestly the details aren’t very relevant to this project; since Home Assistant is the common platform here, any sensor or device that is supported by this (or ESPHome, ZigBee, Z-Wave, etc) can be leveraged.
Assets
The icons and assets were mostly created by myself, or borrowed from freely available sources; the weather icons are a combination of the two. It was a little challenging to find decent quality weather icon images which were also relatively low-resolution – I had to find and import some, then tweak in GIMP to get a result which looked decent on the display. I also wanted to have some simple animations to add a bit of visual flair, but going with a typical route of having separate individual frame animation images would have made the creation of these even more difficult.
Instead, I took a different approach and leveraged some procedural graphics. The animations themselves were simple enough; raindrops/snowflakes falling, lightning flashing, etc are all relatively basic and with this approach I would have the added benefit of some flexibility for the animations: it would be easy to have the raindrops fall at a different rate based upon the intensity of the rain for instance. This was also another excuse to tinker and play around further with C++ classes while also bringing back fond memories of doing the same as a kid in the 80’s with DOS (320×240 @ 8-bit color isn’t too far off from this…)

I also added some features in the app to build on top of the rpi-rgb-led-matrix library, providing some custom font rendering; the default monospaced rendering was a bit too spacious given the resolution limitations. My additions provided the ability to render variable-width glyphs for a number of characters, which drastically improved the quality of the dashboard.
Display & Visibility Improvements
The raw LED matrix display did not have a great degree of visibility, nor very aesthetically pleasing. I decided to try and improve this through a diffuser to reduce some of the empty dark areas around each pixel. This took some experimentation to find the right material and thickness. A few attempts were made with some 3D printed flat sheets, which did not work well. Acrylic was the next choice, and this showed some improvement but also reduced the contrast significantly. Application of some car window tint film helped here.
There still remained some other attributes which I wanted to address, namely the diffuser worked a bit too well and causes some light bleeding between pixels. I created a procedurally generated grid with OpenSCAD, and again more experimentation was needed to find the right thickness and filament choice – but in the end I feel these combined additions made a significant improvement to visibility, while still maintaining a high contrast ratio.
Further Work
A few items I still need to tackle or explore as potential features:
- Wrapping up the enclosure, custom wiring, rear cover, mounting, etc
- Adding the light sensor, case hole and support in code to auto-dim/brighten the display based upon ambient lighting conditions
- Animated icons for non-weather assets, just for the hell of it
- Colored numeric text or other custom icon animations for sensors exceeding some threshold (eg: outdoor PM IAQ is high, display in red, etc)
- Adding 3/4-day weather forecast support
- Potentially adding other sensor data, automation ideas (eg: chore reminders, food shopping use-by reminders, laundry finished alert, etc)
- Adding a speaker for alerts/notifications
- Exploring the new voice features in Home Assistant and potentially leveraging to allow for voice-activated interaction (eg: “show me the weather forecast for the week”)
Code
The code for the application is available at GitHub.
Credit
This project was entirely my own work. Thanks to Henner Zeller for the awesome library and smartbutnot for the original inspiration.
Leave a Reply